들어가며
자바스크립트로 화면에 테이블을 만들어야하는 업무를 받았다. 처음에는 jqGrid를 사용하려고 했으나 복잡하고 디자인도 마음에 들지 않았다...
그러다 회사 팀원분을 통해 Tabulator을 알게 되었는데, 사용하기도 쉽고 디자인도 깔끔해서 너무 마음에 들었다!
그래서 사용 방법에 대해 간단히 정리해보려고 한다.
기본 사용법
tabulator 공식 사이트[1]에 들어가면 메인 화면에 예시가 나온다. 사용법이 너무 간단해서 놀랐다.
1. 테이블 영역을 만들어준다.
<div id="example-table"></div>
2. 자바스크립트 코드로 테이블에 값 채우기
- 간단한 버전
//define data array
var tabledata = [
    {id:1, name:"Oli Bob", progress:12, gender:"male", rating:1, col:"red", dob:"19/02/1984", car:1},
    {id:2, name:"Mary May", progress:1, gender:"female", rating:2, col:"blue", dob:"14/05/1982", car:true},
    {id:3, name:"Christine Lobowski", progress:42, gender:"female", rating:0, col:"green", dob:"22/05/1982", car:"true"},
    {id:4, name:"Brendon Philips", progress:100, gender:"male", rating:1, col:"orange", dob:"01/08/1980"},
    {id:5, name:"Margret Marmajuke", progress:16, gender:"female", rating:5, col:"yellow", dob:"31/01/1999"},
    {id:6, name:"Frank Harbours", progress:38, gender:"male", rating:4, col:"red", dob:"12/05/1966", car:1},
];

//initialize table
var table = new Tabulator("#example-table", {
    data:tabledata, //assign data to table
    autoColumns:true, //create columns from data field names
});- 심화 버전
var table = new Tabulator("#example-table", {
    data:tabledata,           //load row data from array
    layout:"fitColumns",      //fit columns to width of table
    responsiveLayout:"hide",  //hide columns that don't fit on the table
    addRowPos:"top",          //when adding a new row, add it to the top of the table
    history:true,             //allow undo and redo actions on the table
    pagination:"local",       //paginate the data
    paginationSize:7,         //allow 7 rows per page of data
    paginationCounter:"rows", //display count of paginated rows in footer
    movableColumns:true,      //allow column order to be changed
    initialSort:[             //set the initial sort order of the data
        {column:"name", dir:"asc"},
    ],
    columnDefaults:{
        tooltip:true,         //show tool tips on cells
    },
    columns:[                 //define the table columns
        {title:"Name", field:"name", editor:"input"},
        {title:"Task Progress", field:"progress", hozAlign:"left", formatter:"progress", editor:true},
        {title:"Gender", field:"gender", width:95, editor:"select", editorParams:{values:["male", "female"]}},
        {title:"Rating", field:"rating", formatter:"star", hozAlign:"center", width:100, editor:true},
        {title:"Color", field:"col", width:130, editor:"input"},
        {title:"Date Of Birth", field:"dob", width:130, sorter:"date", hozAlign:"center"},
        {title:"Driver", field:"car", width:90,  hozAlign:"center", formatter:"tickCross", sorter:"boolean", editor:true},
    ],
});
실제 사용기
1. HTML
<div>
	<div style="font-size:13px; color:#202020; font-weight:bold;">사용자정보</div>
	<div id="table1" style="width: 100%; margin-right: 50px;"></div>
</div>
<div style="display: flex; margin-top: 20px;">
	<div style="display: flex; flex-direction: column; margin-right: 30px; width: 48%">
		<span style="font-size:13px; color:#202020; font-weight:bold;">주문정보</span>
		<div id="table2"></div>
	</div>
	<div style="display: flex; flex-direction: column; width: 48%">
		<span style="font-size:13px; color:#202020; font-weight:bold;">배송정보</span>
		<div id="table3"></div>
	</div>
</div>
테이블 3개를 이렇게 배치하려고 한다. 그래서 상단의 박스에서 하나의 행을 클릭하면 그와 관련된 데이터를 아래 테이블 2개에 상세 데이터를 보여주는 방식이다.
2. Javascript
const userInfo = new Tabulator("#table1", {
    layout:"fitDataTable",
    placeholder:"No Data Set",
    height:'50vh',
    rowHeader:{
    	headerSort:false,
    	resizable: false,
    	frozen:true,
    	headerHozAlign:"center",
    	hozAlign:"center",
    	formatter:"rowSelection",
    	titleFormatter:"rowSelection",
    	cellClick:function(e, cell){
        	cell.getRow().toggleSelect();
      	}
    },
    columns:[
		{title:"아이디", field:"id", sorter:"string", hozAlign:"center", width:200},
		{title:"이름", field:"name", sorter:"string", hozAlign:"center", width:200},
        {title:"전화번호", field:"phonenumber", sorter:"string", hozAlign:"center", width:200},
        {title:"닉네임", field:"nickname", sorter:"string", hozAlign:"center", width:150},
		{title:"생년월일", field:"birth_date", sorter:"string", hozAlign:"center", width:200},
		{title:"가입일자", field:"init_date", sorter:"string", hozAlign:"center", width:200}
    ],
});

const orderInfo = new Tabulator("#table2", {
    layout:"fitDataTable",
    placeholder:"No Data Set",
    height:'50vh',
    rowHeader:{
    	headerSort:false,
    	resizable: false,
    	frozen:true,
    	headerHozAlign:"center",
    	hozAlign:"center",
    	formatter:"rowSelection",
    	titleFormatter:"rowSelection",
    	cellClick:function(e, cell){
        	cell.getRow().toggleSelect();
      	}
    },
    columns:[
        {title:"주문번호", field:"ord_no", sorter:"string", hozAlign:"center", width:150},
        {title:"수량", field:"quantity", sorter:"string", hozAlign:"center", width:100},
		{title:"주문상태", field:"ord_stat", sorter:"string", hozAlign:"center", width:150},
    ],
});

const deliveryInfo = new Tabulator("#table3", {
    layout:"fitDataTable",
    placeholder:"No Data Set",
    height:'50vh',
    rowHeader:{
    	headerSort:false,
    	resizable: false,
    	frozen:true,
    	headerHozAlign:"center",
    	hozAlign:"center",
    	formatter:"rowSelection",
    	titleFormatter:"rowSelection",
    	cellClick:function(e, cell){
        	cell.getRow().toggleSelect();
      	}
    },
    columns:[
        {title:"주문번호", field:"ord_no", sorter:"string", hozAlign:"center", width:150},
		{title:"배송메시지", field:"dilivery_message", sorter:"string", hozAlign:"center", width:300},
		{title:"주소", field:"address", sorter:"string", hozAlign:"center", width:200},
		{title:"주소 상세", field:"address_detail", visible: false},
    ],
});
usrInfo, orderInfo, deliveryInfo가 각 테이블에 연결되어 있다.
상단 테이블에서 사용자 행을 클릭하면 하단의 두 테이블에 주문정보, 배송정보가 보여진다.
서버에서 데이터를 조회해서 전달해줄때 field에 세팅된 값으로 보내줘야 데이터가 매핑된다.
3. 데이터 가져오기
jQuery(document).ready(function(){
	getInfo();

	userInfo.on("rowClick", function(e, row){
		const userId = row.getData().id;
		fn_getOrderInfo(userId);
		fn_getDiliveryInfo(userId);
	});
});

let userData = [];
let orderData = [];
let deliveryData = [];

function getInfo() {
	jQuery.ajax({
		url: "/testInfo.action",
		type: "GET",
		dataType: "JSON",
		contentType: "application/json; charset=utf-8",
		error		: function(_, textStatus, errorThrown) {
			alert("$!lang.getText('처리 중 오류.')"+"($!lang.getText('관리자 문의'))");
		},
		success: function(data) {
			if(data?.errCnt == "1"){
				alert(data.MSG);
				return;
			}

			userData = [...data?.USER];
			userInfo.setData(userData);
		}
	});
}

function fn_getOrderInfo(userId) {
		const param = { USERID : userId }
		jQuery.ajax({
		url: "/orderTest.action",
		data: jQuery.param(param),
		type: "GET",
		dataType: "JSON",
		contentType: "application/json; charset=utf-8",
		error		: function(_, textStatus, errorThrown) {
			alert("$!lang.getText('처리 중 오류.')"+"($!lang.getText('관리자 문의'))");
		},
		success: function(data) {
			if(data?.errCnt == "1"){
				alert(data.MSG);
				return;
			}

			orderData = [...data?.ORDER];
			orderInfo.setData(orderData);
		}
	});
}

function fn_getDiliveryInfo(userId) {
const param = { USERID : userId }
		jQuery.ajax({
		url: "/deliveryTest.action",
		data: jQuery.param(param),
		type: "GET",
		dataType: "JSON",
		contentType: "application/json; charset=utf-8",
		error		: function(_, textStatus, errorThrown) {
			alert("$!lang.getText('처리 중 오류.')"+"($!lang.getText('관리자 문의'))");
		},
		success: function(data) {
			if(data?.errCnt == "1"){
				alert(data.MSG);
				return;
			}

			deliveryData = [...data?.DELIVERY];
			deliveryInfo.setData(deliveryData);
		}
	});
}
getInfo()를 통해서 초기 화면에서 사용자 정보가 조회되도록 하고, 사용자 정보 테이블에 rowClick 이벤트를 걸어준다.
클릭된 행의 userId를 전달해 해당하는 주문정보, 배송정보를 조회하는 방식으로 진행된다.
결과
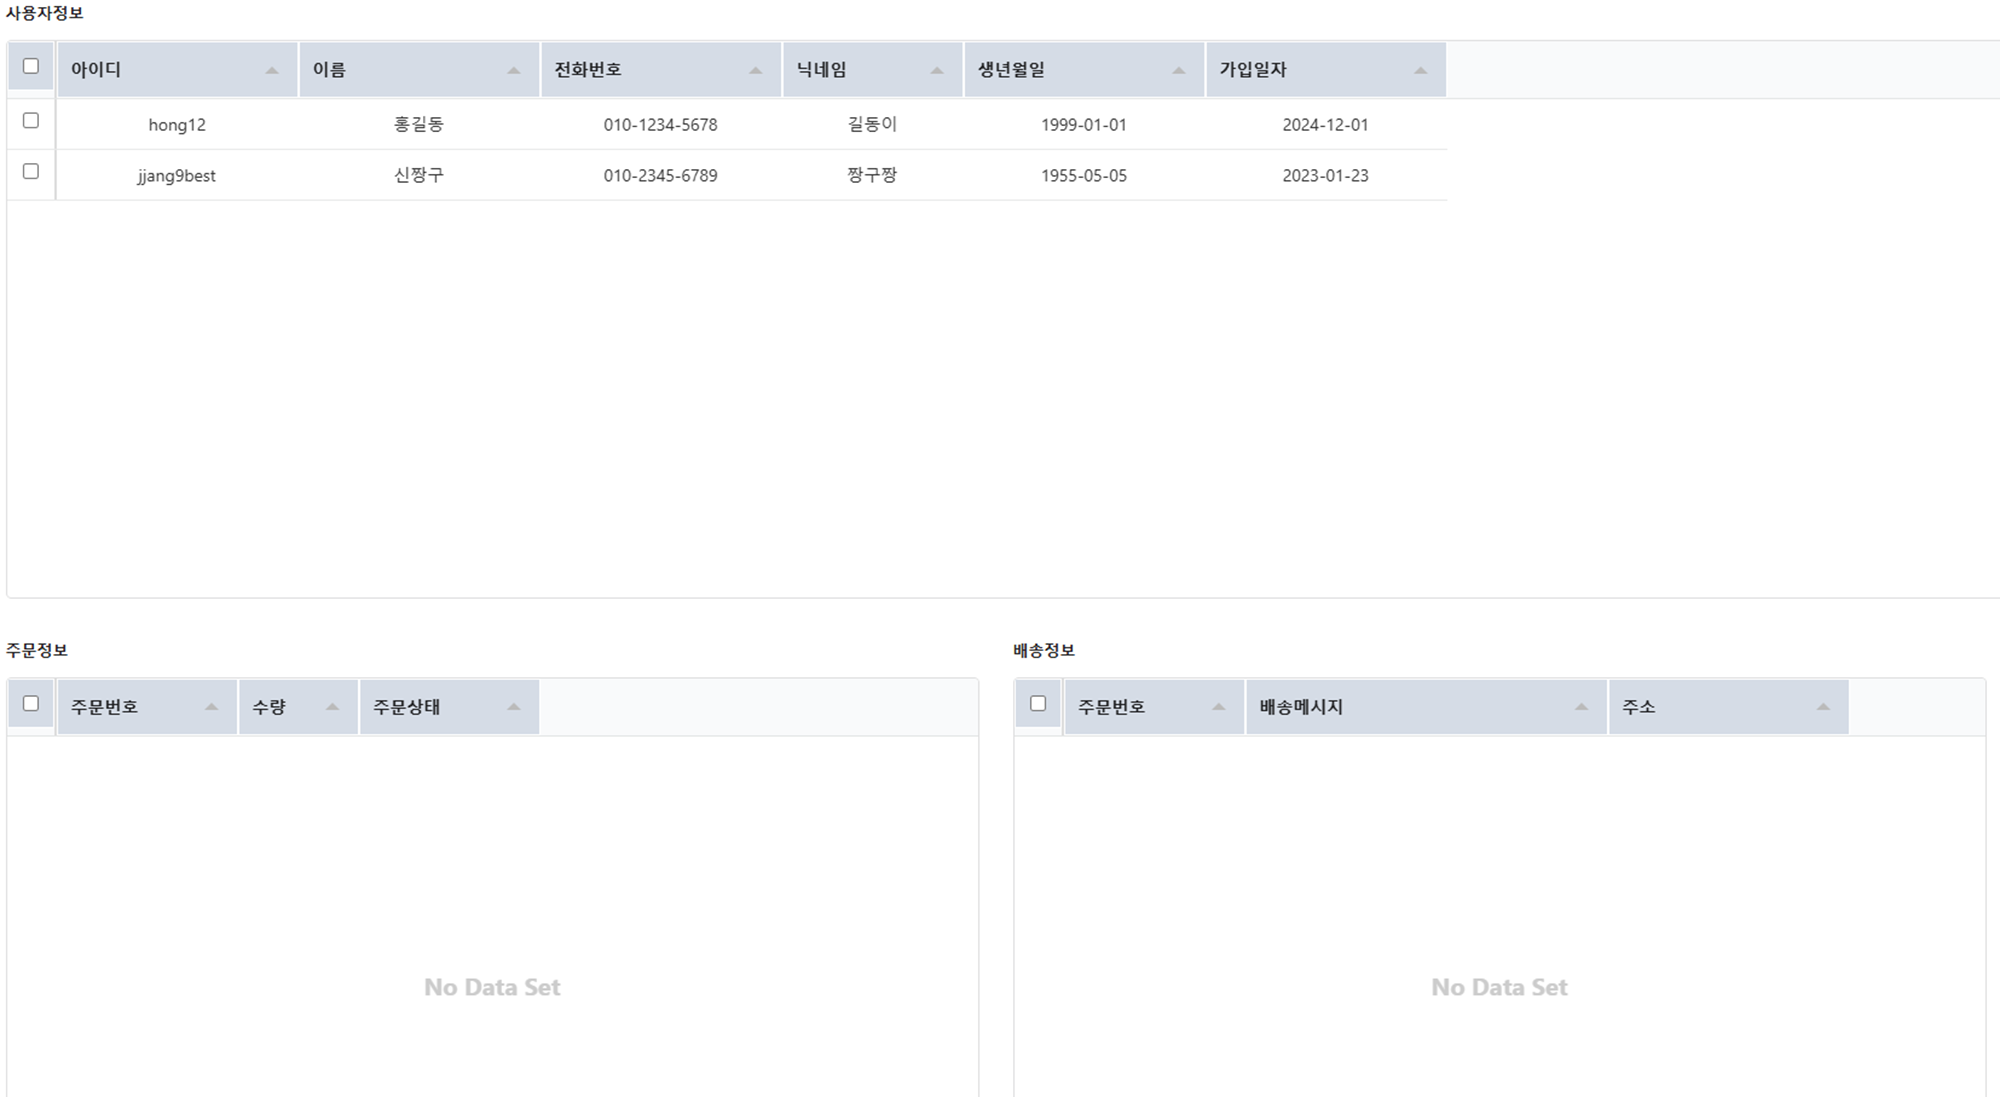
초기 화면에서 사용자 정보가 보여진다.
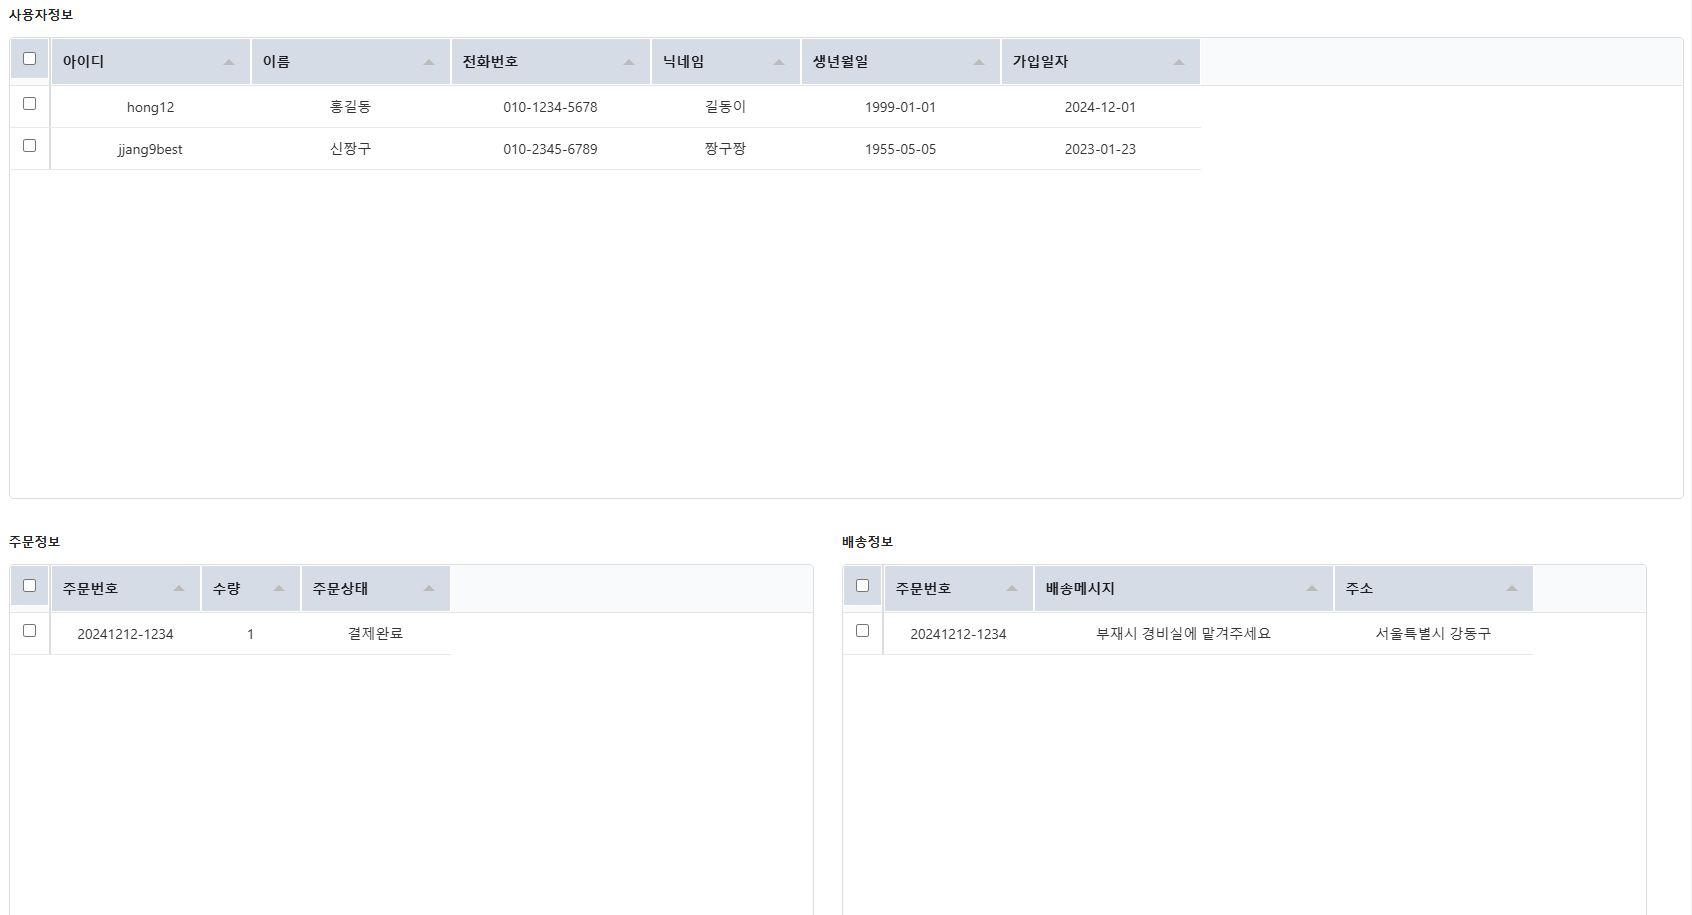
1번 행을 클릭했을 때, 해당 사용자에 대한 주문정보, 배송정보가 화면에 출력된다.

2번 행을 클릭했을 때, 다시 해당 사용자에 대한 정보가 조회되고 화면에 출력된다.
마치며
지금까지 Tabulator 사용해서 테이블을 만들고 서버로부터 데이터를 조회해서 매핑하는 것까지 구현해보았다.
실제 사용 난이도는 굉장히 낮기 때문에 굉장히 마음에 들었다는...
앞으로도 자주 사용하게 될 거 같다!
끝!


댓글